| 
| 
|


The Brush tool draws brushlike strokes, as if you were painting. It lets you create special effects, including calligraphic effects.
Unlike the Pencil tool, the Brush tool draws both a fill and an outline.
SHIFT key : Constrain directions
You can press the Shift key while dragging to constrain drawing to vertical or horizontal directions.
Colors
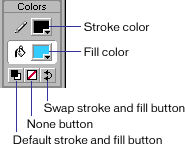
You can specify the color with the Stroke and Fill Color tools.
Color Tools:

Brush Modes
You can specify the Brush Mode in order to define the way the tool works:
- Paint Normal - paints over lines and fills on the same layer.
- Paint Behind - paints in blank areas of the Stage on the same layer, leaving lines and fills unaffected.
- Paint Selection - applies a new fill to the selection when you select a fill in the Fill modifier or the Fill panel. (This option is the same as simply selecting a filled area and applying a new fill.)
- Paint Fills - paints fills and empty areas, leaving lines unaffected.
- Paint Inside - paints the fill in which you start a brush stroke and never paints lines. This works much like a smart coloring book that never allows you to paint outside the lines. If you start painting in an empty area, the fill doesn't affect any existing filled areas.
Brush Modes:

NONE | NORMAL | BEHIND | SELECTION | FILLS | INSIDE
Brush Size
Also, in the Brush options, there is a drop down that lets you select the size of the brush. Simply click the size you want.
Brush Shape
Finally, the Brush options lets you select the shape of the brush. Try experimenting with the different shapes and see what effect each offers.
Lock Fill
The last option listed under Brush options, is the Lock Fill option. The explanation for this is a bit tricky.
When you use the brush tool in it's default state this option is not turned on. Let's assume that you selected a gradient fill and painted something using the brush tool. In this case the brush tool would use the center of your painting as the center for the gradient fill.
Now, if you paint yet another drawing next to the first one, Flash will use the new drawing's center as center for the gradient fill.
However, had you pressed the "Lock Fill" option before drawing the second painting, Flash will maintain the gradient center from the first painting.
The best way to understand this option is trial and error, so if you don't get the above explanation, then try painting with and without the "Lock Fill" option set. While doing so, make sure that you use a gradient fill for the drawing or you won't see any effect at all (because plain colored fills have no center).

|
|

|

|